
Kenmore Stackable Washer and Dryer Manual: A Comprehensive Guide
Navigating Kenmore’s stacked units requires understanding operation, accessing manuals online via Sears PartsDirect, and prioritizing safety precautions for optimal laundry care.
Understanding Your Kenmore Laundry Center
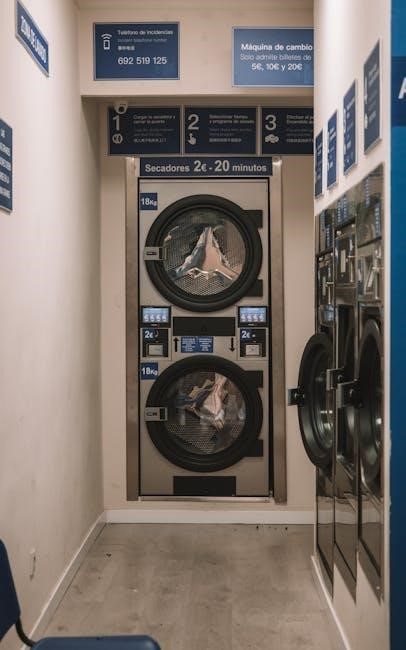
Kenmore stackable laundry centers combine washing and drying into a space-saving unit, often presenting a unique control scheme. Users frequently encounter difficulty understanding operation, as highlighted in Reddit discussions where installers and owners alike seek guidance; These systems typically feature separate controls for the washer (lower unit) and dryer (upper unit), activated by dials and knobs.
The washer initiates with a large dial, pulled out after turning, while the dryer uses a dial for cycle selection and a smaller knob to start. Familiarizing yourself with these controls, alongside locating the model plate inside the dryer door for accurate manual retrieval, is crucial for effective use. Accessing the official Kenmore manual is key to unlocking its full potential.
Model Identification and Manual Location
Accurate model identification is the first step towards finding the correct Kenmore stackable washer and dryer manual. Locate the model plate – typically found inside the dryer door – as this provides the specific number needed for searches. Without this, finding relevant documentation becomes significantly harder.
Once you have the model number (e.g., 41797812704), resources like Sears PartsDirect (https://www.searspartsdirect.com/manual/5hn67hk6ue-000582/kenmore-41797812704-laundry-center-parts) become invaluable. These sites allow direct manual downloads. Remember, variations exist, so a precise model match is essential for accurate instructions and troubleshooting.
Accessing the Official Kenmore Manual Online
Finding the official Kenmore manual online is often the quickest solution. Sears PartsDirect (https://www.searspartsdirect.com/manual/5hn67hk6ue-000582/kenmore-41797812704-laundry-center-parts) is a primary resource, offering downloadable PDFs based on your specific model number.
Beyond Sears, a general web search using the full model number and “manual” or “use and care guide” can yield results. Be cautious of unofficial sources; prioritize those linked to reputable parts retailers or the manufacturer. Kenmore Laundry Center Use and Care Guides (91601 Series) are also available online, covering important safeguards, laundry preparation, and dispenser usage.
Sears PartsDirect Manual Resource
Sears PartsDirect Manual Resource
Sears PartsDirect (https://www.searspartsdirect.com/manual/5hn67hk6ue-000582/kenmore-41797812704-laundry-center-parts) stands out as a dedicated hub for Kenmore manuals. This platform allows users to locate documentation by entering the complete model number, ensuring accurate results.
The resource provides downloadable PDF versions of use and care guides, installation instructions, and parts diagrams. It’s particularly useful for older models where physical manuals may be lost. Beyond manuals, Sears PartsDirect offers exploded views to aid in repairs and maintenance, making it a comprehensive resource for Kenmore appliance owners.
Important Safety Instructions
Prioritizing safety is crucial when operating a Kenmore stackable washer and dryer. Always disconnect power before any servicing, as highlighted in available documentation. Ensure proper electrical grounding to prevent shocks and fire hazards.
Never operate the appliances if damaged, and keep flammable materials away from the dryer. Supervise children around the units. Refer to the manual for specific warnings regarding installation, ventilation, and load capacity. Ignoring these instructions could lead to injury or appliance damage, emphasizing the need for careful adherence to safety guidelines.
General Safety Precautions
Before use, inspect the washer and dryer for any visible damage. Do not operate if parts are broken or missing. Ensure the laundry area is well-ventilated to prevent moisture buildup. Avoid overloading the machines, as this can cause strain and malfunction.
Keep the area around the appliances clear of obstructions. Never attempt to repair the units yourself unless you are qualified; consult a technician for complex issues. Always follow the manufacturer’s guidelines for load size and detergent usage to maintain safe and efficient operation.
Electrical Safety Guidelines
Always ensure the washer and dryer are properly grounded to prevent electrical shock. Never operate the appliances with a damaged power cord or plug. Disconnect the power supply before performing any maintenance or repairs – a crucial step for safety.
Avoid using extension cords, as they can overheat and pose a fire hazard. The electrical outlet should be dedicated to the laundry appliances and meet the specified voltage requirements. If you suspect an electrical issue, immediately discontinue use and contact a qualified electrician for inspection and repair.
Preparing Laundry Loads
Effective laundry care begins with proper load preparation. Sort clothes by color – whites, lights, and darks – to prevent dye transfer. Check pockets for objects like coins or keys that could damage the machines. Close zippers and fasten hooks to avoid snagging other items.
Empty loose items and consider using mesh laundry bags for delicate garments. Understand fabric care symbols on clothing labels to select appropriate wash and dry cycles. Avoid overloading the washer or dryer, as this can reduce cleaning effectiveness and potentially damage the appliances.
Sorting Laundry Properly
Accurate sorting is crucial for preserving your clothes. Separate whites from colored items to prevent discoloration. Divide laundry further by fabric type – delicate items like lingerie should be washed separately or in mesh bags. Heavily soiled items may also require a separate wash cycle.
Consider separating lint-producing fabrics (like towels) from lint-catching fabrics (like corduroy). Always check garment labels for specific washing instructions. Ignoring these guidelines can lead to fading, shrinking, or damage to your clothes, reducing their lifespan and appearance.
Understanding Fabric Care Symbols
Decoding fabric care symbols is essential for proper laundry treatment. A wash tub symbol indicates washing instructions; the number inside signifies the maximum water temperature. A triangle denotes bleaching – an empty triangle means safe to bleach, while a crossed-out triangle prohibits it.
A square indicates drying; a circle within signifies tumble drying, with dots indicating heat level. An iron symbol shows ironing instructions, and a crossed-out iron means do not iron. Familiarizing yourself with these symbols, found on garment labels, prevents damage and ensures longevity of your clothing.
Washer Operation
Operating your Kenmore stackable washer begins with loading sorted laundry. The control panel features a large dial for cycle selection – turn and pull out to start. Left-side dials control the dryer. Cycle options cater to various fabrics and soil levels.
Water temperature settings are crucial; colder water saves energy and protects delicate items. Utilize the detergent dispenser correctly, avoiding overfilling. Refer to the manual for specific cycle guidelines and load capacity recommendations to ensure efficient and effective washing performance.
Control Panel Overview
The Kenmore stackable washer’s control panel centers around a prominent dial for cycle selection. Turning and pulling this dial initiates the chosen wash cycle. Additional dials, typically located on the left side, manage dryer functions. Each knob features descriptive labels outlining available options.
Understanding these labels – like delicate, normal, or heavy-duty – is key. Smaller knobs often adjust settings like temperature or dryness levels. Familiarize yourself with the panel’s layout for seamless operation and optimal laundry results, referencing the manual for detailed explanations.
Cycle Selection Guide
Kenmore stackable units offer a variety of cycles tailored to different fabric types and soil levels. Common options include Normal/Regular for everyday laundry, Delicate for lingerie and sheer fabrics, and Heavy Duty for robust items like towels and jeans. A Bulky/Sheets cycle accommodates larger loads, while a Quick Wash provides a faster cleaning option.
The dryer complements these with cycles like Automatic, Timed Dry, and Delicate. Selecting the appropriate cycle ensures effective cleaning and prevents damage to your clothes. Consult the manual for specific recommendations based on your laundry needs.
Water Temperature Settings
Choosing the correct water temperature is crucial for effective cleaning and fabric care. Kenmore washers typically offer Hot, Warm, and Cold settings. Hot water excels at removing tough stains but can cause fading and shrinking. Warm water provides a balance between cleaning power and fabric protection.
Cold water is ideal for delicate items and colors, minimizing fading and energy consumption. Always check garment care labels for specific temperature recommendations. Utilizing the appropriate temperature setting preserves your clothes’ quality and extends their lifespan, ensuring optimal laundry results.

Detergent Dispenser Usage
Proper detergent dispensing is vital for a successful wash cycle. Kenmore washers feature designated compartments for detergent, fabric softener, and bleach. Typically, a drawer or cup-like dispenser is located within the machine. Always use High-Efficiency (HE) detergent in HE washers to prevent excessive suds.
Follow the detergent manufacturer’s instructions for the correct amount based on load size and soil level. Avoid overfilling, as this can lead to residue. Regularly clean the dispenser to prevent clogs and ensure optimal performance, maintaining your machine’s efficiency.
Dryer Operation
Operating your Kenmore dryer involves understanding its control panel, which features a dial for cycle selection and a knob to initiate the drying process. Turning the main dial selects the desired drying cycle – options include delicate, normal, and heavy-duty. The smaller knob, when turned clockwise, starts the dryer.
Pay attention to the descriptions above each knob for clarity. Moisture sensor settings automatically adjust drying time, while manual settings allow for customized control. Regularly cleaning the lint filter is crucial for efficient operation and safety.
Control Panel Overview (Dryer)
The dryer’s control panel is designed for intuitive operation. A large dial governs cycle selection, offering options like delicate, normal, heavy duty, and timed dry. Adjacent to this, a smaller knob initiates the drying process – turning it clockwise activates the dryer. Clear descriptions are printed above each control, guiding users through available settings.
Understanding these controls is key to achieving optimal drying results. Familiarize yourself with each cycle’s purpose and adjust settings based on fabric type and load size for efficient and safe operation.
Drying Cycle Options
Kenmore stackable dryers offer a variety of cycles to cater to diverse laundry needs. Common options include ‘Delicate’ for fragile items, ‘Normal’ for everyday fabrics, and ‘Heavy Duty’ for bulky loads like towels and jeans. A ‘Timed Dry’ setting allows for customized drying durations, while ‘Air Fluff’ provides a no-heat refresh.
Selecting the appropriate cycle ensures optimal drying performance and prevents damage to clothing. Consider fabric type, load size, and desired dryness level when choosing a cycle for best results and prolonged garment life.
Moisture Sensor Settings
Kenmore dryers frequently feature moisture sensor technology, automatically detecting when clothes are dry and halting the cycle. This prevents over-drying, saving energy and minimizing fabric wear. Settings typically include options to adjust sensitivity – ‘High’ for thicker items, ‘Low’ for delicates, and an ‘Auto’ mode that intelligently adapts.
Proper sensor function relies on a clean lint filter and avoiding overloaded loads. If clothes remain damp after a cycle, check the sensor bars inside the dryer drum for lint buildup, ensuring accurate moisture detection for efficient drying.
Lint Filter Maintenance

Regular lint filter cleaning is crucial for dryer safety and efficiency. A clogged filter restricts airflow, increasing drying time and posing a fire hazard. Kenmore dryers typically have a lint filter located either inside the dryer door or on top of the machine.
Remove and clean the filter after every load, using your fingers or a soft brush to remove accumulated lint. Periodically, wash the filter with mild soap and water to remove any residue. Inspect the lint trap housing for any built-up lint as well.
Using Dispensers
Kenmore stackable units feature dedicated dispensers for detergent and fabric softener in both the washer and dryer. The washer’s dispenser typically has compartments for pre-wash detergent, main wash detergent, and fabric softener. Always follow the detergent manufacturer’s instructions regarding quantity.
For the dryer, the fabric softener dispenser usually involves a round compartment. Ensure it’s not overfilled to prevent staining clothes. Regularly check and clean both dispensers to prevent clogs and ensure proper dispensing, maintaining optimal laundry results.
Washer Detergent Dispenser
The Kenmore washer detergent dispenser commonly features separate compartments for pre-wash detergent, main wash detergent, and fabric softener. Use only HE (High Efficiency) detergent, as standard detergents create excessive suds. Fill compartments according to the detergent’s instructions and load size, avoiding overfilling.
Ensure the dispenser is clean to prevent residue buildup and clogs. Some models have a removable dispenser drawer for easier cleaning. Regularly inspect and wipe down the dispenser to maintain optimal performance and prevent detergent from impacting wash cycles.
Dryer Fabric Softener Dispenser
The Kenmore dryer’s fabric softener dispenser is typically a small cup-like compartment. Pour liquid fabric softener into the dispenser, being careful not to exceed the “max fill” line. Overfilling can cause staining or residue on clothes. The dispenser automatically releases the softener during the final rinse cycle, imparting fragrance and reducing static cling.
Regularly check the dispenser for buildup and clean it with warm water to ensure proper function. Avoid using dryer sheets and liquid softener simultaneously, as this can reduce their effectiveness and potentially leave residue.
Laundry Aids and Uses

Selecting the right laundry aids enhances cleaning and fabric care. Detergents come in various forms – powder, liquid, and pods – each suited for different needs and water temperatures. Liquid detergents dissolve easily, while powders are often more economical. Pods offer pre-measured convenience.
Fabric softeners reduce static, soften clothes, and add fragrance. Options include liquid softeners added to the dispenser and dryer sheets used during the drying cycle. However, avoid combining both, as it can diminish effectiveness and potentially leave residue on fabrics.
Types of Detergents
Choosing the appropriate detergent depends on your laundry needs and machine type. Powder detergents are cost-effective and work well in hard water, but may leave residue. Liquid detergents dissolve easily, making them suitable for all temperatures and preventing residue, though they can be more expensive.
Detergent pods offer pre-measured convenience, eliminating guesswork, but may not dissolve completely in cold water or heavily soiled loads. HE (High Efficiency) detergents are specifically formulated for HE washers, producing fewer suds and protecting the machine’s components.
Fabric Softener Options
Fabric softeners enhance laundry by reducing static cling and adding fragrance, leaving clothes feeling softer. Liquid fabric softeners are dispensed during the rinse cycle, providing excellent softening but potentially reducing towel absorbency. Dryer sheets are added directly to the dryer, offering convenience and static control, though they can leave a residue on the drum.
Fabric softener crystals dissolve in water during the wash cycle, offering a long-lasting scent and softening effect. Consider scent-free options for sensitive skin or allergies, and always follow the manufacturer’s instructions for proper dosage.
Stain Removal Guide
Effective stain removal requires prompt action and appropriate treatment. Pre-treating stains before washing significantly improves results. Common stains like grass, mud, and food respond well to enzyme-based detergents or stain removers. For oil-based stains, a pre-treatment with dish soap can help lift the stain before laundering.
Always test stain removers on an inconspicuous area first to ensure colorfastness. Avoid using hot water on protein-based stains like blood, as it can set them permanently. Consult specific stain guides for challenging stains like ink or wine, and remember to rinse thoroughly after treatment.
Common Stain Treatments
For grass and dirt, pre-soak with cold water and a laundry detergent containing enzymes. Bloodstains benefit from immediate rinsing in cold water; avoid hot water. Food stains often respond to a paste of baking soda and water applied before washing. Oil and grease require dish soap directly on the stain, gently rubbed in, then laundered.
Ink stains are tricky; try rubbing alcohol (test first!). Wine stains can be treated with salt to absorb the liquid, followed by a cold water rinse. Always check garment care labels before applying any treatment, and avoid harsh chemicals on delicate fabrics.

Pre-Treating Stains Effectively
Effective pre-treatment is crucial for successful stain removal. Apply stain removers directly to the affected area, gently working it in with a soft brush or cloth. Allow the solution to sit for at least 15-30 minutes, but avoid letting it dry completely. For stubborn stains, consider a longer soaking period, checking periodically.
Always test the stain remover on an inconspicuous area of the fabric first to ensure colorfastness. Rinse thoroughly with cold water before washing the garment in your Kenmore washer. Remember, prompt action significantly increases the chances of complete stain removal.
Troubleshooting Common Issues
Encountering problems with your Kenmore stackable unit? A washer failing to drain often indicates a clogged drain pump or hose – check for obstructions. If the dryer isn’t heating, inspect the heating element and thermal fuse; a disconnected power supply is also a possibility.
Before attempting repairs, disconnect power. Consult the manual for specific error codes. Online resources like Repair Clinic and Sears PartsDirect offer diagnostic assistance and replacement parts. Remember safety first, and if unsure, contact a qualified technician.
Washer Not Draining
If your Kenmore washer isn’t draining, first check the drain hose for kinks or clogs. A common culprit is a blocked drain pump filter – locate and carefully clean it, ensuring all debris is removed. Verify the drain hose isn’t inserted too far into the drainpipe, restricting flow.

Also, confirm the washer’s lid switch is functioning correctly; it prevents operation if the lid isn’t securely closed. If issues persist, the drain pump itself may be faulty and require replacement. Always disconnect power before inspecting internal components.
Dryer Not Heating

When a Kenmore dryer fails to heat, the most frequent cause is a blown thermal fuse. This safety device protects against overheating and needs replacement if triggered. Another common issue is a faulty heating element; testing its continuity with a multimeter will confirm its condition.
Inspect the gas valve (for gas dryers) or the power supply to the heating element (for electric models). A clogged lint filter restricts airflow, causing overheating and potential component failure, so ensure it’s clean. Always disconnect power before any inspection or repair attempts.
Maintenance and Care
Regular cleaning extends the life of your Kenmore stackable unit. For the washer, run a cleaning cycle monthly with a washer cleaner or hot water and vinegar to remove residue. Wipe down the drum and door gasket after each use to prevent mildew.
The dryer requires consistent lint filter cleaning after every load to maintain airflow and prevent overheating. Periodically vacuum the lint trap housing. Inspect and clean the dryer vent annually to avoid fire hazards and ensure efficient drying.
Cleaning the Washer
To effectively clean your Kenmore washer, initiate a monthly cleaning cycle using a commercially available washer cleaner, or a solution of hot water and white vinegar. This removes detergent buildup and mildew.
After each wash, wipe down the drum’s interior and, crucially, the rubber door gasket to prevent mold and unpleasant odors. Pay special attention to the folds of the gasket. Regularly inspect and clean the detergent dispenser drawers to avoid clogs. A clean washer ensures optimal performance and longevity.
Cleaning the Dryer
Maintaining a clean dryer is vital for safety and efficiency. After every load, meticulously clean the lint filter – a clogged filter reduces airflow and poses a fire hazard. Periodically, vacuum the lint trap housing to remove any lingering fibers.
Wipe down the dryer drum’s interior with a damp cloth to remove residue. Inspect and clean the exterior of the dryer regularly. Ensure the dryer vent hose is unobstructed and free of lint buildup; professional cleaning is recommended annually to prevent fires.
Belt Replacement (Mechanical)
Replacing the dryer belt is a common mechanical repair. Always disconnect power before starting! Access typically requires removing the dryer’s front or rear panel. Carefully note the belt’s routing around the motor, idler pulley, and drum before removal – a diagram is helpful.
Install the new belt, ensuring proper tension and alignment. Reassemble the dryer, verifying all connections are secure. Refer to genuine OEM documents from Repair Clinic for detailed instructions specific to your Kenmore model; safety is paramount during this process.
Genuine OEM Documents and Repair Clinic
For reliable maintenance and repair, utilizing genuine Original Equipment Manufacturer (OEM) documents is crucial. Repair Clinic provides comprehensive Kenmore Washer/Dryer Combo manuals, care guides, and literature, ensuring accurate instructions. These resources detail everything from routine maintenance to complex troubleshooting.
Accessing these documents guarantees compatibility and optimal performance, maintaining appliance functionality. Repair Clinic’s genuine parts and detailed guides empower users to confidently address issues, extending the lifespan of their Kenmore laundry center and avoiding costly service calls.
Related Posts


old craftsman scroll saw manual
Welcome to the Old Craftsman Scroll Saw Manual, your comprehensive…

2013 nissan rogue manual
The 2013 Nissan Rogue manual provides essential guidance for owners,…